NVR local interface - Search and Backup
Here you can search, review, and archive recorded video and snapshots. This section has six pages, accessed by the hotlinks at top. At any time, click Close in the lower right, or the X icon in the upper right, to return to the live view.
- By Date
- By Time
- By Event
- Tag Management
- Image Management
- Backup Status
By Date
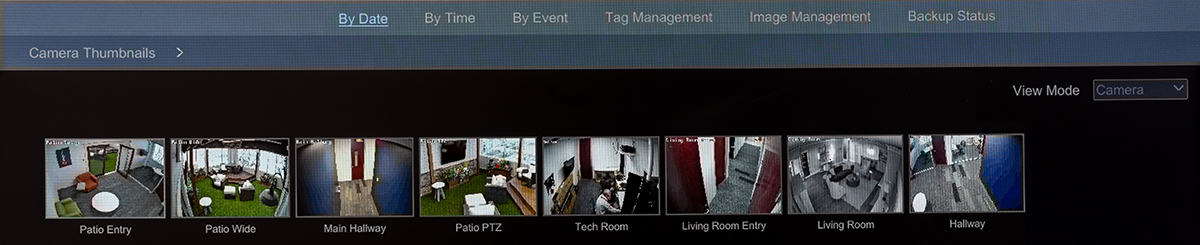
When this first opens, the system requires you to select a cameras for the date search.
Either click the carat next to Camera Thumbnails to select a camera from the list, or double-click an image, or click on an image and click Open in the lower right corner.
Searching the selected camera's archives by date
The system displays a page with the camera's timeline and images.
-
Timeline
-
Picture dropdown
-
Results
-
Playback
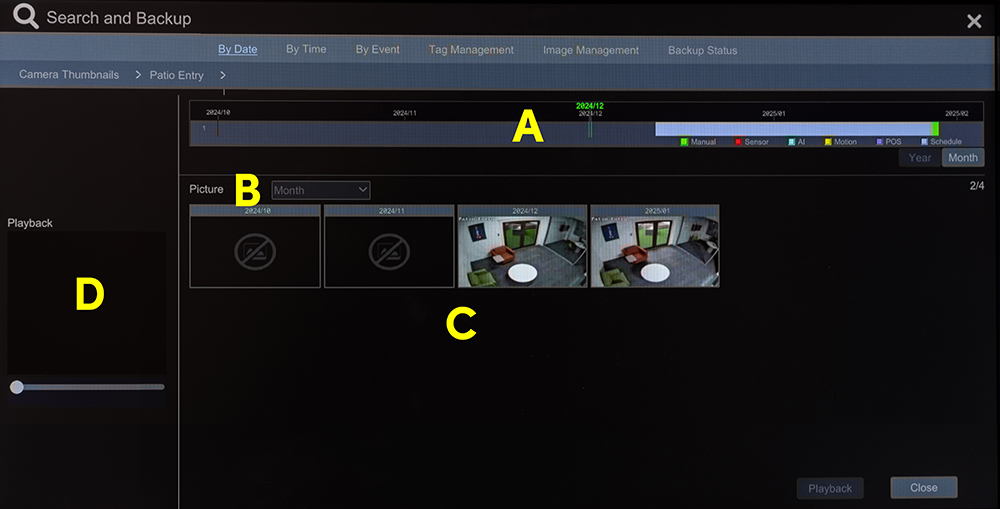
This page shows all results for the selected camera a cross a designated span of time. The page initially opens at the smallest time increment that does not overflow the available space. For example, in the image shown, the camera opens at the year level since there are only three months with available recordings top search. Notice that the timeline runs from October 2024 to February 2025 (less than one year's worth of video files).
The results window show one image for each time increment for the current span. In the case of the sample image, each month has one result. Note that the Picture dropdown (B) shows the span covered by each result.
Click on a result and press Playback. The system plays all videos back to back, starting at the beginning of the span.
Double-click a result to narrow the search to the next smaller time increment, or click on a result and then click the rightmost button below the timeline (in the sample image, it's labeled Month). If possible, you can expand the search by clicking the left button below the timeline (in this case, labeled Year, and disabled because there is less than one year's worth of results).
The timeline plays the camera's timeline showing all recordings, across the entire time spans, color-coded by type. Click in this timeline to get a timestamp for that spot on the timeline.
Additional options
When you are at the lowest span, you can use the Picture dropdown to toggle between results by hour, or results by minute.
The Set Backup Time button appears at the hour level.
By Time
This displays results for all channels for a period ranging up to 24 hours.
A) Cameras
Click the + icon in the center of an empty camera window to open the dialog and select the camera(s) to use for the search. No results display until you select a camera
Once a camera window is filled, options appear in the top right of the camera window. Click Modify to change the camera shown, or Clear to remove it.
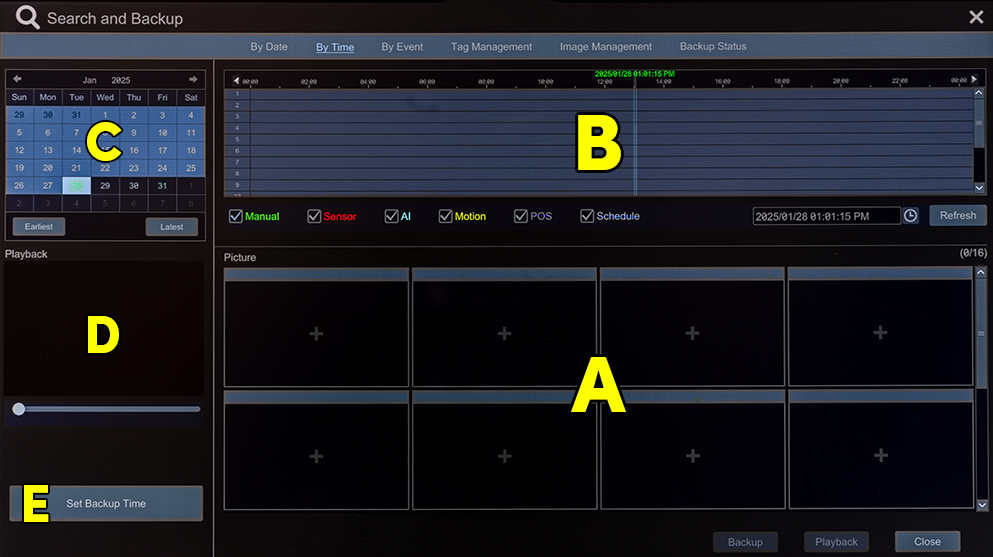
Click Playback to go to the Playback window, preloaded with the added channels and at the spot marked on the timeline.
B) Timeline
This shows all recordings available, color-coded by type. Use the checkboxes at the bottom to select which type(sw) of recordings to display.
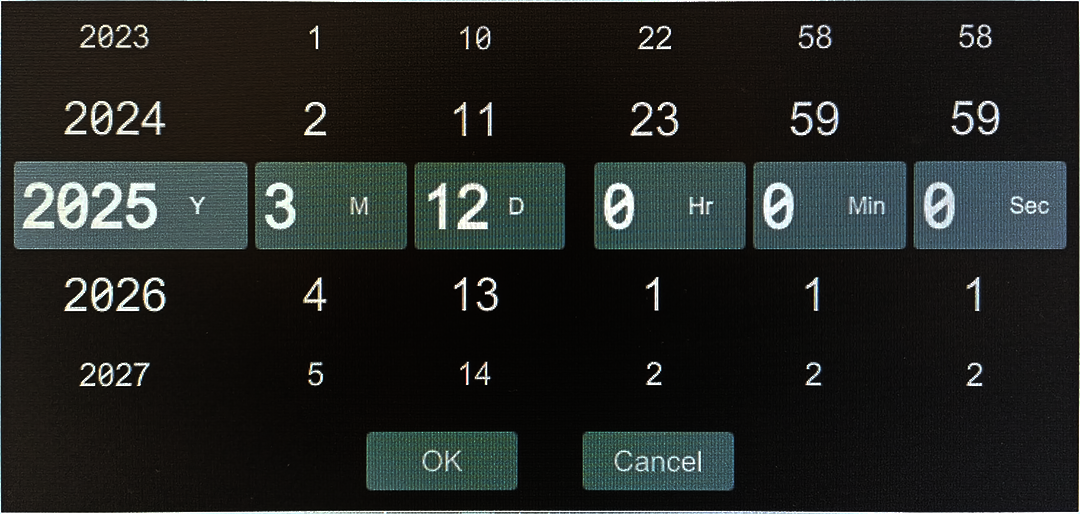
Click the arrows at the top right and left to pan the timeline. You can also click and drag the top black bar with the timestamps. Click the time and date box to the lower right to open a window to specify an exact time; in this window, use the mouse wheel to spin the various counters up and down.
When the mouse is in the timeline, mouseover text appears that informs you of the exact time of the mouse's position.
A floating control appears when the mouse is over the timeline. Use these to zoom in and out, or to switch the timeline scale between 12 and 24 hours.

Click inside the timeline to select a starting time for video review. Click and drag on the timeline to select channels and a time spread, then click Backup or Delete to perform that task with those recordings.
C) Calendar
All dates with available recordings are highlighted in blue. Click on a date to set the timeline to that point. Click Earliest or Latest to move to the first or last date (respectively) with available archives.
D) Playback
When you select a specific camera, this displays the recording from that camera starting at the moment marked in the timeline. Scrub the progress bar below the video window to preview the feed of the selected channel.
E) Set Backup Time
Create an archive of all events that take place between two specified times.
By Event
A) Time filter
Click here to open a flywheel dialog to specify a time period to search. Use the mouse wheel to spin the various counters up and down.
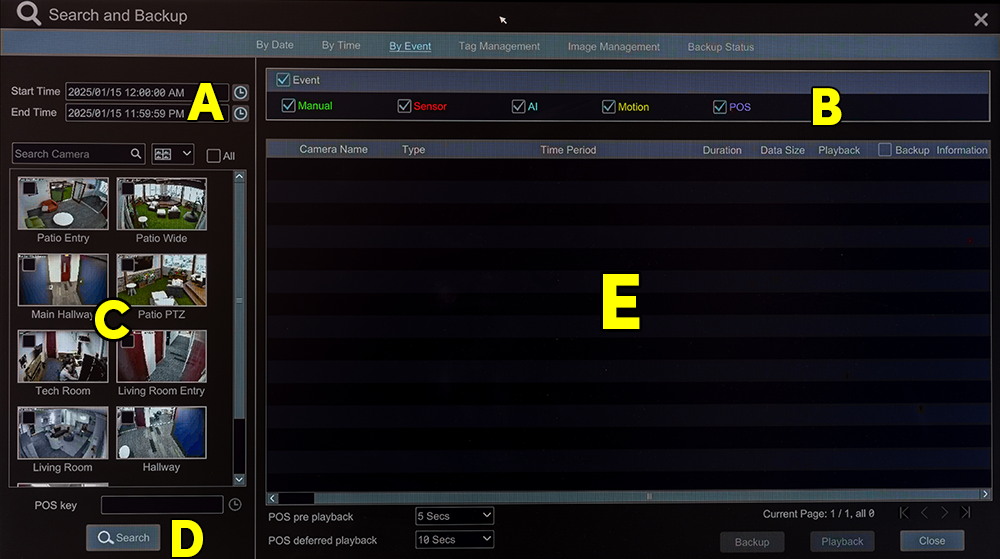
B) Event filter
Check the box(es) for the event type(s) to include. Click Event to (de)select all options.
C) Camera filter
This shows all cameras connected to the NVR; use the dropdown to change how the cameras are displayed. Select the cameras to include in the search by clicking on each; or click All for mass selection. You can also search by camera name.
D) Search
If searching for POS events, enter the POS key to single out the POS desired.
Click Search to review all files that match the filters.
E) Results
This shows all events that fit the search criteria.
Select events to archive by clicking their selection boxes; click Backup to create the new archive. Enable POS pre playback and POS deferred playback to add extra time before and after the events themselves.
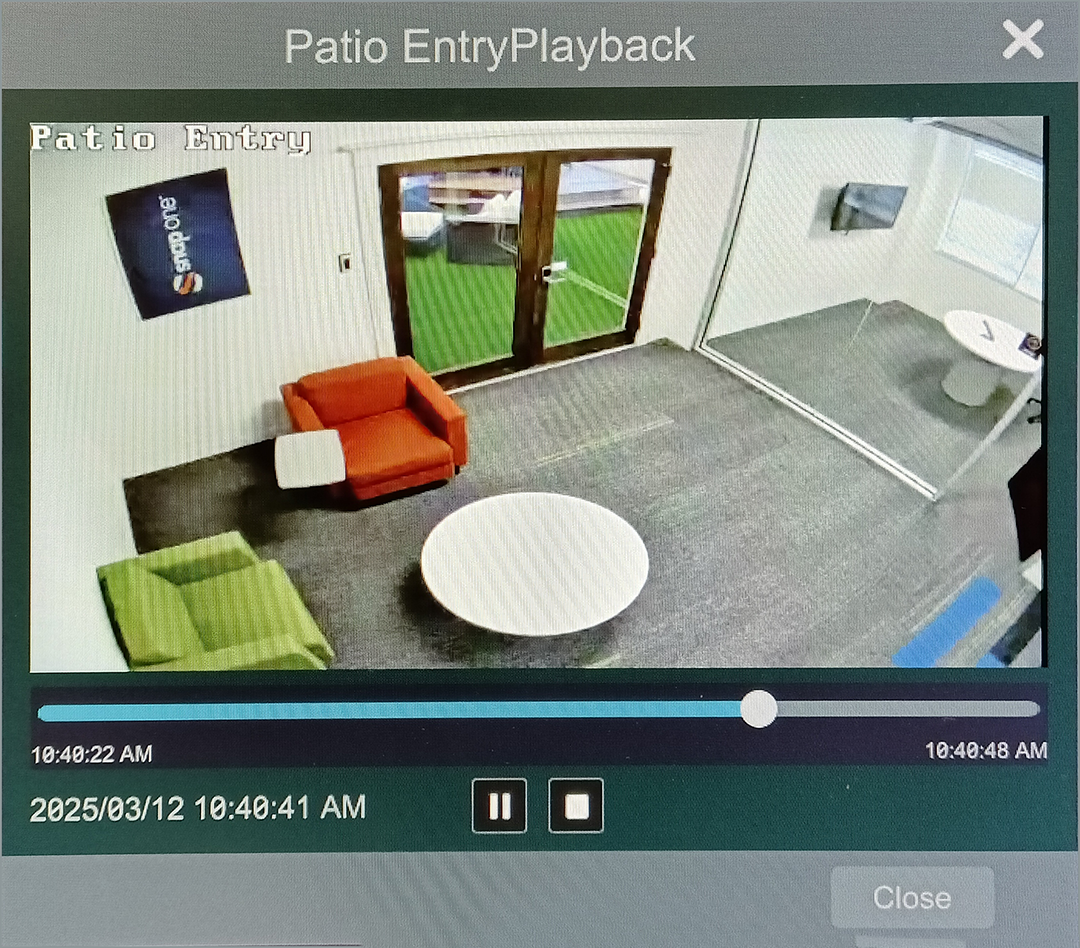
Click a file's playback icon to open a popup review window.
Tag Management
This is used with POS systems. Describing POS tags is beyond the scope of this document.

Image Management
This lists all event snapshots in the system.
Click the top of any column to sort. Click the carat at the top of a column to refresh the data.
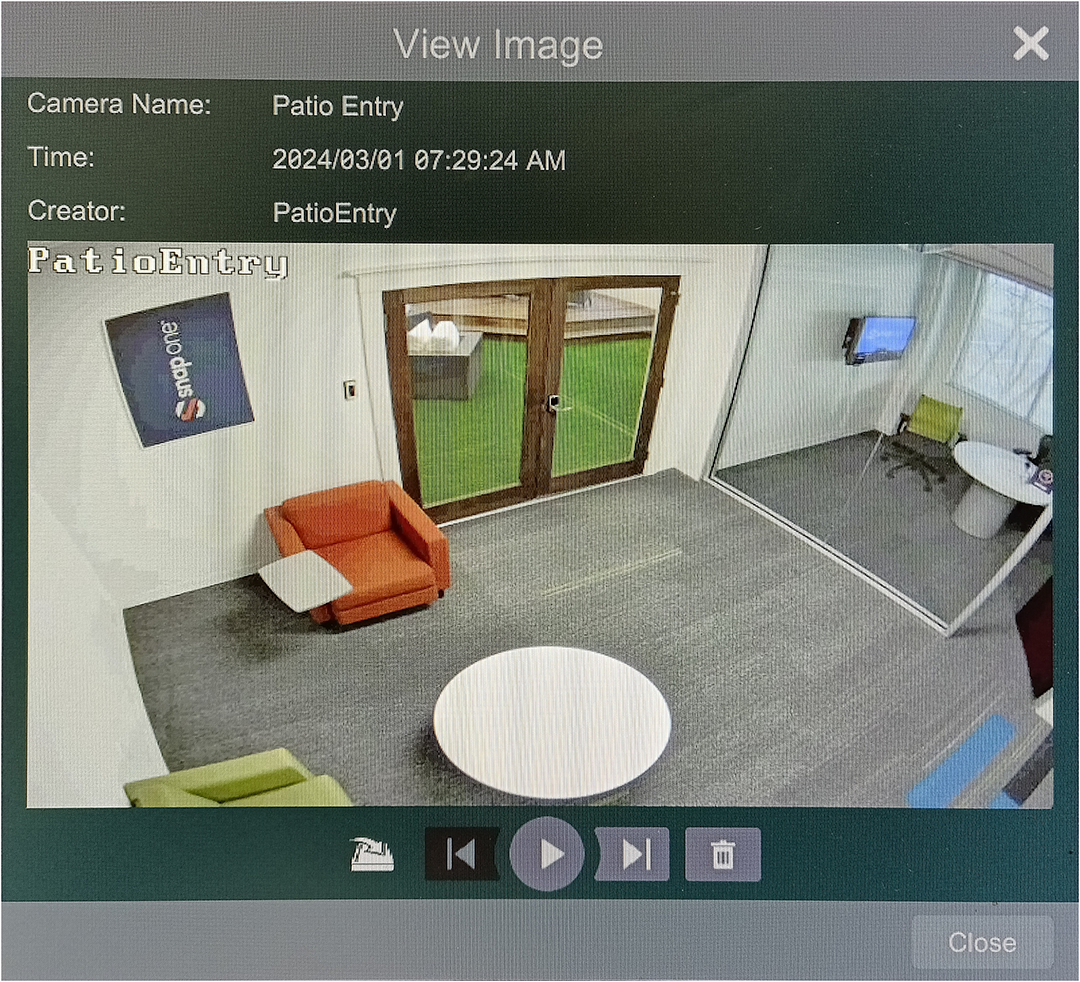
Click the browse icon to view the image in a popup. In the popup, you can export the image, delete it, and navigate to view other images.
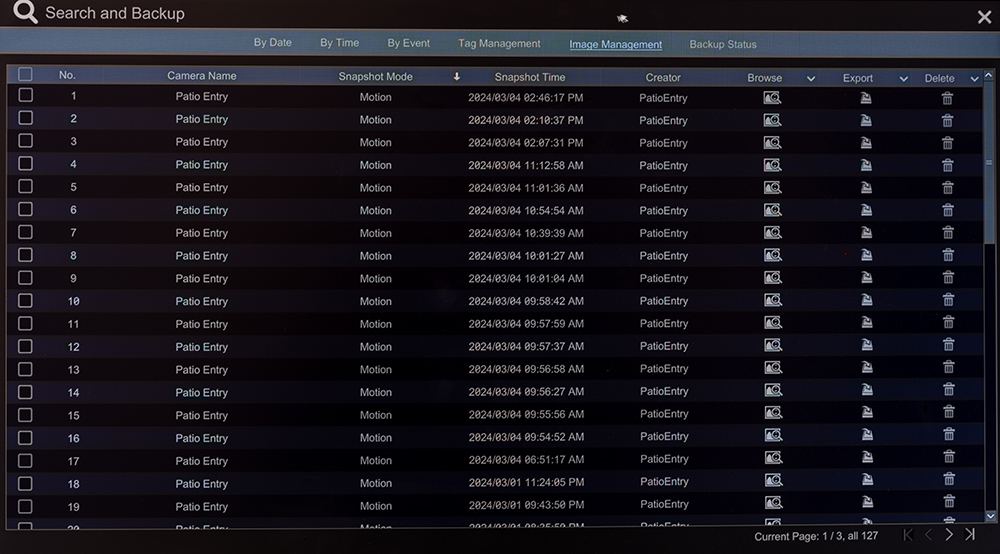
Click the Export or Delete icons to select a file for that action. Click the carat at the top of a column to complete the action for all selected files and refresh the list.
Backup Status
This shows the status of all backup operations being undertaken.
Select processes by clicking icons in the Operation column, then use the carat at top to suspend or resume those operations.

Select backups to delete by clicking icons in the Delete column, then use the carat at top to delete those archives.